What Lies Beneath … Aluminum Siding (Part 1)

Below is a repost of a guest blog from Des Moines Rehabbers Club on removal of alumnim siding. Some good tips and tricks in there! Stay tuned for Part 2.
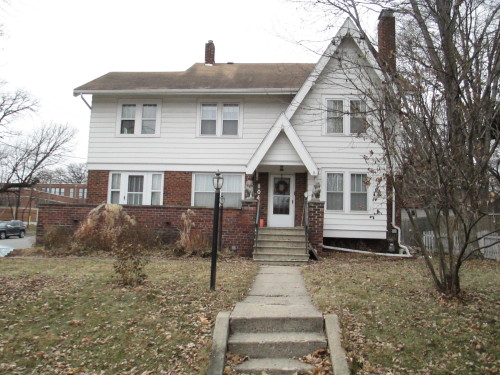
I’ve always loved old houses: their solidity, their detailed craftsmanship, their beautiful woodwork, their strange little nooks and crannies that seem to have no purpose. I value original construction to an extent that some people probably find me peculiar. I rejoice in original kitchens and bathrooms, no matter how inconveniently designed, and regularly complain to my husband, Scott, about how the replacement windows and vinyl siding have ruined the house at the end of the block. Scott caught the old house bug from me and in the four years since we purchased our 1920 craftsman home, we have refinished the hardwood floors, repainted the interiors, removed the heavy draperies and curtain rods that obscured the beautiful trim around our (39!) windows, and replaced the 1980’s ceiling fans that were in every room with refurbished vintage light fixtures.
I should have been satisfied with that, but the aluminum siding that had been installed in the 1960’s kept nagging at me. I often wondered what might be underneath. I really, really wanted to take off the siding, but Scott, being more practical than I am in these matters, pointed out that we didn’t have extra funds to repair the exterior. So, for four years, I waited and wondered what was under the aluminum siding.
Finally, we had enough funds to start making some repairs to the exterior. One beautiful April evening, when we were out for a walk, I mentioned that I wished we could find out what was under the aluminum siding. To my surprise, Scott said, “Let’s do it! We can take that little section off over the front porch tonight.” By the time we got home, it was dark, but we couldn’t wait until morning. Scott got up on the ladder with a crowbar while I stood below holding a flashlight. After removing the first two panels and tearing off the foil-backed paper underneath, we found cedar shingles. In good condition! They had some water marks and needed a good cleaning, but they weren’t rotten. We pried off the rest of the siding over the porch and the shingles were all just as good. We excitedly texted photos to friends and family.
I was ready to continue on with the rest of the house, but Scott was still hesitant. What if we were just lucky with the first section and the rest of the house was a big mess. So we tried another small strip next to the front door. That one was good, too. We decided to ask a contractor who specialized in older homes come out to give us an opinion on the siding and some other needed repairs. He advised us to take off all the aluminum siding and then he would come back to give us a bid on repairs once we knew what we were dealing with.
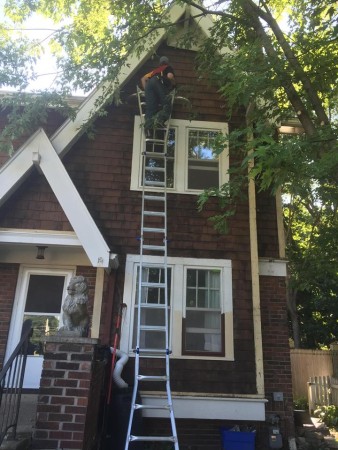
It rained almost every day in May and June and we do have to go to work during the week, so that slowed things down considerably. However, over a period of two months, we finished three sides and just need to have the electricity turned off so we can finish the southwest corner where the electric lines are. Most of the shingles are in pretty good condition, but we will need to replace some of them around the windows and the chimney and about 50% on the south side. We had to invest in a tall ladder as the peaks are pretty high. I’m a bit nervous about heights, though. I can work on a ladder as high as the middle of the second story windows, but after that, I just can’t bring myself to climb any higher. I tried to force myself to go higher a couple of times, but each time I froze and had to climb down. Fortunately, Scott is not afraid of heights, so he’s been able to reach more places. Even with the new ladder, we can’t get any higher than the top of the second story windows on the north and south sides, so we’re looking into renting a cherry picker to get up to the peaks.
There are some tools and techniques that are needed to do the job well: a tool belt with a pouch/pockets, rubberized gloves, a prybar, a pliers, a metal spackling knife, and a box cutter. A face mask is good too, as a tremendous amount of dirt accumulates under siding that’s been up that long. When we took the siding off the shady northeast side, a four-foot tall vertical ant farm complete with 60 years worth of dirt and cobwebs came tumbling down on us. Yuck! A short-handled soft-bristle brush is also good for sweeping most of the dirt off as you go.
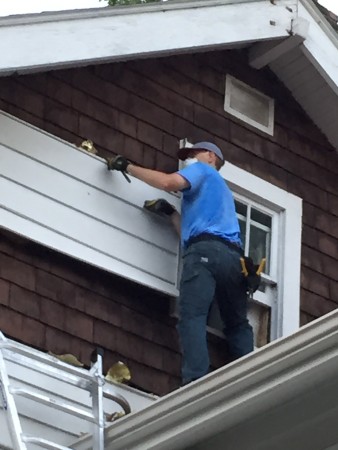
Start at the topmost piece of siding and slice along any calking with the box cutter. Then start prying out the nails along the top of the siding. It’s important to place the metal spackling knife under the prybar as you pry out the nails so you don’t damage the original siding underneath. It’s a good idea to place the nails in the pocket of your tool belt as you go along as it’s almost impossible to find them if you drop them. They’re aluminum, so you can’t find them with a magnet. Otherwise, your lawnmower will help you with that later. If some break off, you can sometimes pull them out with a pliers, but if that doesn’t work, hammer them in so they’re flush or a little sunken into the siding and cover them with wood filler later. Once you’ve gotten all the nails out along the strip, pull the siding towards you and down to pop it out from the lip of the piece below it. Then drop it onto the pile below with a big crash! Well, at least that’s how we do it. There will also be metal trim strips around the windows. Be sure to remove those once you have removed all the horizontal siding pieces. We found foil-backed paper stapled over the shingles after we removed the aluminum. It was easy to rip it off, but we needed to remove hundreds of staples afterwards!
At some point, you will need fill all the nail holes with wood filler as they go into the sheathing underneath. It’s easier to do that as you go along so you don’t have to come back later. But don’t worry if you don’t get to it right away. Just be sure to fill the holes before you start washing the siding. After doing some research, we decided on Minwax Wood filler as it comes with a nozzle so you can easily squirt it into the nail holes. It holds up well outdoors and can be sanded and stained or painted if needed.
The final step before repairing damaged sections and painting or staining is washing the original siding. Lots of people want to power wash their wood siding or shingles. This is a big mistake with original older siding, which is attached directly to the wood sheathing. The intense pressure of the power washing forces water into the sheathing and it could take months for everything to dry well enough to paint or stain. Power washing will also send paint chips flying for half a block or more, which goes against lead-paint removal guidelines and is hazardous to your neighbors. Use a garden hose with a spray attachment to clean the original siding. Be sure to stand high enough to spray downward and hold the sprayer at least a foot away from your siding so you don’t force water up under the shingles or the clapboards. You will also need to scrub it a bit with a mild soap or TSP and water solution. We found that a quarter cup of Oxyclean in a couple of gallons of water works well, particularly on mildew stains. We used a vegetable scrub brush to scrub the stubborn stains and then rinsed with water. Even though we brushed off most of the dirt first, mud was flowing down the side of the house!
If your original siding has been painted, a safe way to remove the old lead paint is to place drop cloths on the ground and hand-scrape the loose paint. Wear a face mask and change clothes before you enter the living areas of the house. It’s ok to leave the firmly attached pieces. Do not power sand lead paint. You can also use a heat gun or infrared heat plate to loosen the paint and scrape it off. However, there is a risk that the wood will start smoldering underneath where it’s not visible. Some people have started house fires doing this! I recommend leaving that method to the professionals. If you have lots of lead paint scrapings, you should bag them up and take them to a hazardous waste facility. You can also use paint stripper. We found a product called Lead Out that is non-toxic and bonds with the lead and chemically changes it so that the paint scrapings can be placed in a trash bag with your regular trash. The siding can then be washed with mild soap and water to neutralize it. However, this stuff is expensive – about $75 for a quart, so we’re only going to use it on the flat trim around the windows and doors.
Another important thing to know is that if you are painting over old paint or stain, you must use an oil-based primer. Latex primer over old oil paint or stain will cause your paint job to start flaking off in a couple of years. You don’t want to go to all that trouble and have to redo it again so soon! We also chose an oil-based enamel top coat for the trim and an opaque stain on the shingles. Our shingles have lots of water marks and stains. An opaque stain will cover like paint, but it sinks into the shingles and bonds with them. If you ever need to re-stain them, just clean and stain – no scraping needed.
It’s amazing how much attention our project has attracted. Friends, neighbors and passersby all take an interest. At one point, we had a pile of aluminum on the driveway. A man stopped by, who was doing construction across the street, and asked what we were planning on doing with the aluminum. We had intended to sell it to a scrap dealer, but since we didn’t own a pick-up, we were wondering how we were going to get it there. Since it would cost us as much to rent a pick up as we would be paid for the scrap aluminum, we told him that he could have it and to stop by anytime. Whenever we put a pile of aluminum on the driveway, the next day it is gone. If only we could dispose of the rest of our construction debris so easily.
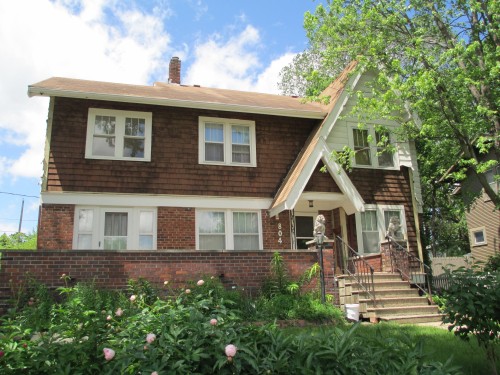
Our next door neighbor has had several contractors out to bid on a new roof. One day, one of them came over when we were working on the house. He was very excited about our project and gave us lots of unsolicited advice. He insisted that our shingles had never been stained (they clearly had been). He said that cedar was self-cleaning and all the water marks and mildew stains would disappear on their own if we left everything to weather for a year. He starting digging into a shingle with his fingernail to prove that the shingles were same color underneath as on the surface, which made us a bit nervous. We have enough repairs to make without some random guy creating more damage just to make a point. He also told us that when we request to have the power disconnected so we could take the siding off where the electrical wiring enters the house, the city would require us to redo our electrical wiring in the house to upgrade to 200 amp, which would cost us about $5000. He suggested that we ask someone to take the siding off on that side without turning off the power. We weren’t too keen on being forced to rewire our house for a large sum, but we didn’t want to risk someone being electrocuted, either. A call to the city permit office reassured us. As long as we were just temporarily detaching the wires and not making any other adjustments to how the electrical wiring entered the house, no upgrades were needed. A little more research showed that his ideas about allowing the shingles to weather for a year and not cleaning them before staining were incorrect as well. We did mention this to our neighbor as the contractor’s incorrect advice and cavalier attitude towards a potential electrocution didn’t bode well for his skill at roofing, either. We’re thrilled with the transformation of the house so far. It already looks so much better and we haven’t even replaced any damaged shingles or done any painting or staining. Several people driving by have stopped to complement us on the new look.
Stay tuned for Part Two once we finish our project.